
Posted by: Muhammad Asad Ishaq (Factory Resent your iPhone)
Factory Reset your iPhone
Whether you’re selling your old iPhone, giving it to a family member, fixing a software glitch, or just want a clean start, a factory reset wipes your phone back to the way it was on day one. The good news? The process is almost identical across the iPhone 13, 14, 15, 16, and 17 series, since Apple keeps the reset menu in the same place across all modern iOS versions. This guide walks you through everything in plain, easy language, with notes on where things differ slightly between models.
What Does a Factory Reset Actually Do?
A factory reset (Apple calls it “Erase All Content and Settings”) deletes everything from your iPhone — photos, apps, messages, saved passwords, accounts, and settings — and returns it to its original, out-of-the-box state. It’s different from a “soft reset” (just restarting the phone) or a “hard reset” (force-restarting a frozen phone). A factory reset is permanent, so backing up first is essential.
Before You Reset: 3 Things You Must Do
- Back up your data. Go to Settings > [Your Name] > iCloud > iCloud Backup, and tap “Back Up Now.” Or connect to a Mac/PC and back up through Finder or iTunes.
- Sign out of iCloud (only if giving away or selling the phone). This removes Activation Lock so the next owner can set it up. Go to Settings > [Your Name] > scroll down > Sign Out.
- Remove your SIM or eSIM plan (if switching phones). For physical SIMs, eject the tray. For eSIMs, you can transfer or leave it — Apple will guide you during setup on the new device.
How to Factory Reset: iPhone 13 (All Models)
The iPhone 13, 13 Mini, 13 Pro, and 13 Pro Max all use the same reset path on iOS 15 through iOS 18.
- Open Settings
- Tap General
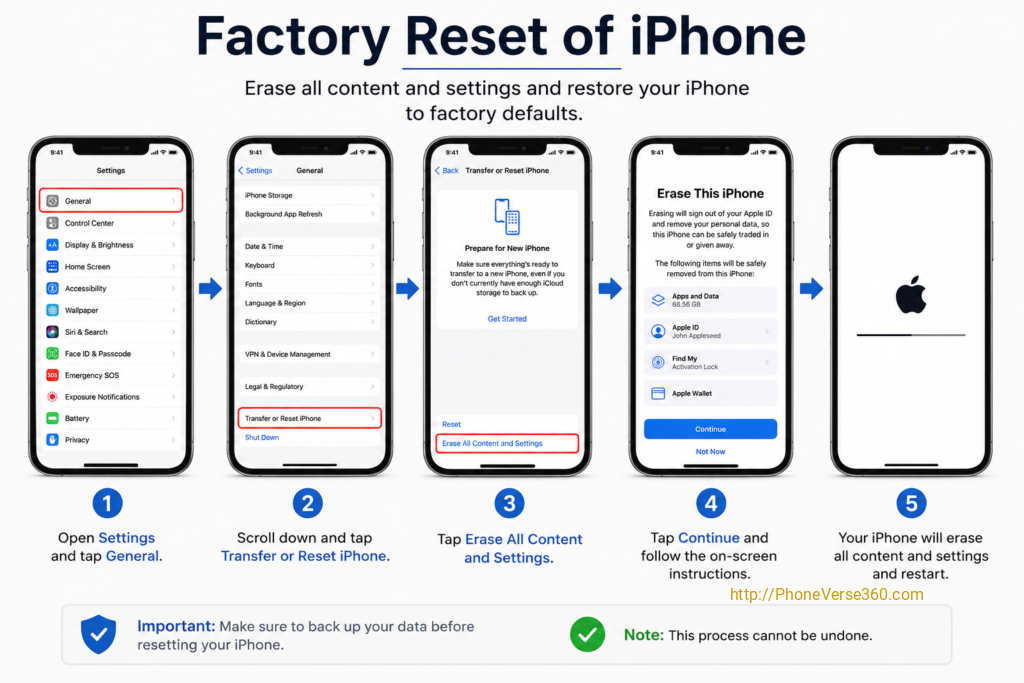
- Scroll down and tap Transfer or Reset iPhone
- Tap Erase All Content and Settings
- Enter your device passcode
- Enter your Apple ID password when asked
- Tap Erase iPhone to confirm
Your iPhone 13 will restart and boot up to the “Hello” welcome screen, confirming the reset worked.
How to Factory Reset: iPhone 14 (All Models)
The iPhone 14, 14 Plus, 14 Pro, and 14 Pro Max follow the exact same steps as the iPhone 13. Apple did not change the reset menu location for this generation.
- Settings → General → Transfer or Reset iPhone
- Tap Erase All Content and Settings
- Confirm with your passcode and Apple ID password
- Tap Erase iPhone
One thing worth noting for the iPhone 14 series: if your phone was involved in a Crash Detection or Emergency SOS event, make sure any related notifications are cleared before reset, though this won’t block the process.
How to Factory Reset: iPhone 15 (All Models)
The iPhone 15, 15 Plus, 15 Pro, and 15 Pro Max use the same menu path too. The only physical difference on the Pro models is the new Action Button, but it has no role in resetting your phone.
- Settings → General → Transfer or Reset iPhone
- Tap Erase All Content and Settings
- Confirm with your passcode and Apple ID password
- Tap Erase iPhone
If your iPhone 15 uses USB-C and you’re backing up via cable to a computer first, make sure you’re using a certified cable so the transfer doesn’t get interrupted.
How to Factory Reset: iPhone 16 (All Models)
The iPhone 16, 16 Plus, 16 Pro, and 16 Pro Max continue with Apple’s standard reset flow, unchanged from previous generations.
- Settings → General → Transfer or Reset iPhone
- Tap Erase All Content and Settings
- Confirm with your passcode and Apple ID password
- Tap Erase iPhone
If your iPhone 16 has Apple Intelligence features enabled, some personalized data (like Siri suggestions and on-device learning) is also cleared automatically during the reset — no separate step needed.
How to Factory Reset: iPhone 17 (All Models)
[For detail specs of iPhone 17 all models click here
The iPhone 17 series keeps the same reset process. Apple has not changed this core menu structure in years, which makes it one of the most consistent features across iPhone generations.
- Settings → General → Transfer or Reset iPhone
- Tap Erase All Content and Settings
- Confirm with your passcode and Apple ID password
- Tap Erase iPhone
As with the 16 series, any AI-personalization data tied to your Apple ID and on-device models is wiped along with everything else.
What If You Can’t Access Settings? (Reset via Computer)
If your iPhone is frozen, disabled, or you’ve forgotten your passcode, you can reset it using a computer instead:
On a Mac (macOS Catalina or later):
- Open Finder
- Connect your iPhone with a cable
- Select your iPhone in the sidebar
- Click Restore iPhone
- Confirm and follow the on-screen steps
On a Windows PC:
- Open iTunes
- Connect your iPhone with a cable
- Select your device icon
- Click Restore iPhone
- Confirm and follow the on-screen steps
This method works the same way regardless of whether you have an iPhone 13 or an iPhone 17.
What If You Forgot Your Passcode Entirely?
If you’re locked out completely and can’t get into Settings at all, you’ll need to use Recovery Mode or DFU Mode via a computer, which erases the phone without needing the passcode. This is a good fallback across all iPhone 13–17 models since none of them offer a way to bypass a forgotten passcode from the device itself.
After the Reset: What Happens Next
Once your iPhone restarts, you’ll see the Hello screen and go through the standard setup — choosing a language, connecting to Wi-Fi, and either setting the phone up as new or restoring from your backup. If you’re selling or gifting the phone, stop at the language screen and hand it over as-is; the new owner will complete setup with their own Apple ID.
Quick Recap
No matter which model you own — iPhone 13, 14, 15, 16, or 17 — the reset process is the same:
Settings → General → Transfer or Reset iPhone → Erase All Content and Settings
The only real differences between models are cosmetic (Action Button, USB-C, Apple Intelligence data), not procedural. Back up first, sign out of iCloud if you’re passing the phone along, and you’ll be done in under five minutes.
For more information and articles: Click Here
Leave a Reply